My MQTT Signal Lamp (IP44)
As a part of many IoT or IIoT Project we need a simple Signal Lamp to show the status of a machine or any other status in the production queue. I was thinking that must be an easy job. Yes, from many vendors you get a lot of industrial and certified lamps. The low light of all that is the quite high price, and, in the end, they are not open to all platforms.
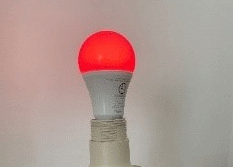
What I did: There is a very cool and free open-source firmware called Tasmota. It is free for commercial use and so free to use for industrial use. To find supported hardware it is easy to search at the Tasmota Project website. Most of them are Wifi connected and driven by an ESP8266 or ESP8285 chip. One of those devices is a RGBW-Lamp in an E27 thread, see pictures below.
Bill of material (BOM):
- A waterproofed lamp case for industrial use – Amazon
- The Gosund WB3 RGBW-Bulb – Amazon
- Open Firmware Tasmota
Things to do:
- Flash the lamp with the new firmware using Tuya-convert
- Config the lamp as you need
- Place it where you need it

Flash the firmware
All the new cool electronic hardware things are coming from china. Most of them are preconfigured and flashed with and vendors specific firmware. One of there is from Tuya which is well spread and well known. BUT, in industrial environments it is unthinkable that any data and any device is connected to the outside world or outside your corporate and secured network.
The process for flashing the device is very well documented at heide.de, so I skip that 😉
Hardware you need, steps to process:
- Raspberry Pi 3 or 4
- No wifi connection, tuya-convert makes a fake AccessPoint playing the Tuya-Cloud
- Internet connectivity through ethernet
- New Raspian Linux
- Download tuya-convert from website
- Do the process
After that your device spans a self-hosting Access Point with the IP 192.168.1.4.
Connect your PC or Phone to that AP to configure your Wifi Network.
Your Wifi Network must be an WPA2 protected, not form based Authentication protected WLAN.
My favorite default settings for Tasmota:
Backlog Hostname gosund4; Topic gosund4; FriendlyName TischlampeBüro;
Backlog ssid1 AP-IoT; password1 #####; MqttHost 192.168.1.1xx; MqttUser user; MqttPassword haha;
Backlog TelePeriod 60; Timezone 99; TimeDST 0,0,3,1,2,120; TimeSTD 0,0,10,1,3,60;
backlog ntpserver1 192.168.1.1xx; ntpserver2 192.168.1.1xx; ntpserver3 192.168.1.1xx;
# default OTAUrl = http://thehackbox.org/tasmota/release/tasmota.bin  for release firmware
Backlog OtaUrl http://thehackbox.org/tasmota/release/tasmota.bin; upgrade 1;
# OtaUrl http://192.168.1.1xx:1880/tasmota/tasmota.bin  # on my local host
# setting the GPIOs for the device! -  https://templates.blakadder.com/gosund_WB3.html
backlog Template {"NAME":"Gosund WB3","GPIO":[0,0,0,0,40,0,0,0,37,38,39,0,0],"FLAG":0,"BASE":18}; Module 0;
# enable a WebInterface Password (username = admin)
backlog WebPassword @sUpersecure;
#disable the WebInterface Password
backlog WebPassword 0;
# more settings can be found here
start https://github.com/arendst/Tasmota/wiki/Commands
Place the bulb wherever you want!
As configured the device gives Status message every 1 minute, so you can easily monitor status and Wifi connection status. In a separate blog post I will write down how to monitor a device.
In the Webconsole you will see something like that:
Oh, I forgot!!! To turn a specific color:
Put in the Webcosole the command: color 770000 for a gentle red
I post the command via MQTT:
cmnd/devicetopic/COLOR 770000
Let’s play a little with the colors:
770000 red
007700 green
00000077 using the separate white LEDs to turn on a very bright light!
Tipp: NEVER put the RGB Leds together with the white Leds ON!!!
That’s all – a professional industrial IP44 save Signal Light!